Quantcast
Channel: MollyMooCrafts » Christmas Crafts
Viewing all 16 articles
Browse latest View live

Christmas Crafts for Kids

$
0
0

There’s just too much cuteness out there at the moment for kids Christmas crafts, simple low-cost ideas for the smallies to have festive fun with… and maybe make some personalised handmade presses for grandma too :)

Here’s a round up of my favourite Christmas crafts for kids, perfect for creative fun at home and at school.
-
jump on to see all the crafts and links-

Snowy Christmas Village – made from toilet roll cores and cupcake paper liners. adorable :) via NurtureStore

Santa Buddies – simple wine cork, red felt and cotton wool craft that the kids will absolute adore doing. Would look just too cute hanging off your christmas tree.

Melted Hama Bead Glitter Tree Ornaments by MeetTheDubians. Super simple, all you need are some christmas cookie cutters and Hama or Perler beads…. and a warm oven of course.

Toilet Roll & Old Sock Carollers by thinklyspread. So simple. So Doing :)

Iceskating with Santa - simple cardboard paint and pipe cleaner craft, now hanging in Molly’s bedroom!! free printable skate template included via MollyMoo :)

Toilet Roll and Twig Reindeer by kiertoidea – inspired no-cost craft using the simplest of materials.

Macaroni Snowflakes – don’t they look fantastic. I would think you need a glue gun or fast acting glue for this one. via katyelliott

North Pole Playmat – about the most amazing idea yet from the genius that is NoTimeForFlashCards

Elf Yourself a fab fun project for kids – photo and construction paper craft idea. Molly was looking over my shoulder when I found this one and wants to make NOW!! via Art With Ms. Chiddo

-
AND if you want ‘more’ then here’s a link to last year’s Christmas Crafts For Kids Round-up Ho! Ho! Ho!


Nativity Crafts for Kids

$
0
0

Now THAT’s cute :)
-
wine corks, felt and elastic bands….. awwwwwh
Nativity Crafts for Kids via creamamma

DIY Christmas Cards, Potato Printing

$
0
0

The biggest hit over the past two Christmases were my Potato Print Penguin Christmas Cards, so I thought what better way to kick off this year’s festive crafting than with some more potato printed DIY Christmas Cards, and this time is was the turn of a chubby lovesick snowman and an antler bird (don’t bother googling that, I just made it up :)

diy christmas cards

-
diy christmas cards


diy christmas cards

Christmas Crafts: Papier Mache Snowman

$
0
0

I’m vibrating with excitement with how these little guys turned out, teetering on the edge of a craft fail at one stage*, they persevered to become the cutest darn snow couple in Snowdom…

I was suffering a bit of papier mache withdrawl over the past few weeks so Christmas Crafts on MollyMoo just had to begin with newspaper and glue :)

christmas crafts, papier mache snowman

-
christmas crafts, papier mache snowman

-
papier mache snowman, christmas crafts for kids

-

Papier Mache Snowmen – Here’s How To Make Yours

All you need in terns of materials per snowman is a milkshake bottle or similar, ball of newspaper, white paint, artificial/confetti snow (can be substituted with flaky sea salts, Maldon sea salt or similar).

To accessorise I just cut up an old wooly hat :)

-

Stage One: Tape the newspaper ball to the top of the plastic bottle

papier-mache-snowman-stage1

-
Stage Two:
Papier mache over the entire surface and leave overnight to dry. One layer is enough you will be delighted to read!!

papier-mache-snowman-how-to

-
Stage Three:
‘lash’ on some white paint and while wet sprinkle over the loose confetti snow, patting it into place where needed.

papier-mache-snowman-how-to2

-
Stage Four
: when the paint is dry to the touch it’s time to accessorise
– I took a scissors to an old wooly hat to make the shawl and scarf, held in place at the front with a little Copydex glue. The buttons are fixed in place with glue also
– The earmuffs are made by wrapping a piece of soft wire with embroidery thread, glued into place with a pom pom over each ear
– A light pink coloured colouring pencil gave the cheeky their frosty glow
– Dots of black paint for the eyes and mouth
– I rolled a tiny piece of paper into a cone shape and glued it onto the face to make the nose, and painted it orange.

papier-mache-snowman-crafts

tada, you have a snowman…. or snow-woman :)

-

-
*So the craft fail mentioned above!!!!! well I first thought it would be cool (and fun for Molly) to just spray snow over the papier mache, and when dry we could accessorise. Well the pressurised can of artifical snow was an absolute disaster – if I painted first before spraying it wouldn’t have been too bad but the pressurised snow just didn’t work. I was going to throw it all out but in a lightbulb moment I tried wiping off all the dry sprayed snow with some kitchen paper and thankfully the papier mache cores were perfect underneath – no mush :)

mollymoo-christmas-crafts

Christmas Crafts: How to Make A Snow Globe

$
0
0

This has got to be one of the quickest and easiest of the Christmas Crafts Molly and I have enjoyed doing together in the past fortnight. Once I had the supplies gathered it took less than 5 minutes from start to shake.

how to make a snow globeAll you need is a jar, superglue, glitter, plastic figurines and a glue gun.

I strongly recommend using Kilner or similar jars, used for making jams and preserves, as they have a seal inside the lid, this means you don’t have to go to extra lengths after the snow globe is made sealing the lid on to prevent leaking.

-
how to make a snow globeFirst place your figurines on the inside of the lid and pop the jar over just to test what height everything will be when the globe is finished. Depending on the height of the lid you may, as I did, have to put a little styrofoam under your figuringes to lift them up a bit so they ‘take command’ of the jar space, if you know what I mean :)

-
diy snow globeWhen you’re satisfied that the positions and heights are fine glue the figurines in place with fast acting superglue (adults need to do this bit).

While the glue is setting fill the jar almost to the top with cool tap water.

Time to test again – insert the lid with the figurines into the jar of water, tighten and turn upside down to test the water level – ensure the water level is over the top of the figurines, with a little room to spare at the top.

Now remove the lid again, add the glitter to the water jar and stir. Many tutorials I had read online added glycerine  to the water – I tried this but it just made the glitter clump so I poured it down the sink and started again with just water.DIY snow globe
-

Time to finish: with your glue gun run a ring of glue around the inside of the lid and as quickly as you can (before the glue hardens) close the lid on the jar and tighten, tighten, tighten.
-

DIY snow  globe
-
how-to-make-snow-globe5

-
are you read to shake ??

enjoy
Michelle xx

Simple Kid Made Decorations

$
0
0

Molly was troubled by a few ‘gaps’ on the Christmas Tree on Sunday SO we had to make some more decorations, and quickly. What follows is a pinterest inspired story of a humble little toilet roll core that became a star – a sort of Ugly Duckling-esque sweet tale :)

Once Upon A Time there was a little toilet roll, which when cut into slices and stapled together on each side became a star. A quick squirt of gold and silver spray added some slimmer and shine, over which a little craft glue was dabbed and glitter sprinkled to create the shiniest star the tree had ever seen. The silver star seemed to need a little extra touch of bling so after some humming, hawing and chin scratching white sticker dots joyfully provided the perfect finishing touch.

and the moral of the story is….. glitter rocks!!!

kid made christmas tree decoration

-

handmade-silver-decoration

-

the plain toilet roll core slices, awaiting adornment

kid made christmas tree decoration

-
all is well in the world… the gap has been filled :)
-
kid made christmas tree decoration

Cute Christmas Crafts – the collection

$
0
0

It’s getting EVER closer to the day when the man in the big red suit makes his long awaited appearance, so I decided I would round-up all the MollyMoo Christmas Crafts from last year and this into one quick-find post, to help when planning what to do with our time off.

Just click on the individual craft links to be brought straight to the tutorials… I hope you enjoy making xx

-
-
Papier Mache Snowman

How To Make A Snowglobe
Tic Tac Snow – Wine Cork and Felt Game (I so so love this :)

christmas craft by mollymoo-

Toilet Roll Stars: Miss7’s most recent craftiness – she found a few gaps on the tree that just ‘had’ to be filled :)

Papier Mache Santa, a favourite on our tree for the second year running

handmade decorations by mollymoo


-
Cardboard Snowboarding Reindeer
, with free template printable – just cut, glue and paint

Santa Ice Skate door hanger, with free template, just cut and paint

Papier Mache Snowman Pen – so quick and easy, the coolest pen ever and a great gift idea for friends

crafts crafts and printables by mollymoo

-
Potato Printed Christmas Cards

Antler Bird and Snowman
Lovable Penguin Cards, great fun to make together with the kids

handmade christmas cards


Free Printables – Christmas Tree Garland

$
0
0

There’s still a little time left for even more decorating the house for Christmas so as a little gift from MollyMoo, a small token of my appreciation to you my readers for your continued support, I have a free printable Christmas Tree Garland for you to make your home a little bit prettier.

-
free printable christmas tree garland

-
Free Printables - click here to download

I printed the A4 template on a variety of Christmas scrap-booking paper to give a nice mix of colour and pattern. You will get three trees from each A4.

free printable christmas tree garland by mollymoo, Michelle McInerney


Just cut out each triangle

free printable christmas tree garland by mollymoo, Michelle McInerney

-
Fold the triangle in half, pattern side in, and snip along the guide lines (introducing the hairy hands of my design colleague Con, who can be credited with this garland idea :)

free printable christmas tree garland by mollymoo, Michelle McInerney

-
Then just open the triangle up, flatten, and pull gently downwards to open up the cascading gaps. Punch one hole at the top of each tree and string along to decorate a wall, mantel, patio door etc.

free printable christmas tree garland

-

Enjoy, and Happy Christmas my friends xx


Pom Pom Snowballs – the very best indoor fun

$
0
0

By far the biggest hit of the holidays so far has been a bucket of pom pom snowballs (sorry Santa!! didn’t mean to steal your thunder :). I made two buckets, one for a friend’s three children and one for Casa MollyMoo. The weather has been so ‘cat’, as we say in Ireland, so indoor amusement has been the order of the day – the joy of the pom pom is that no matter how hard you pelt your opponent, even when two of you are ganging up on daddy on the couch, you cannot cannot hurt anyone.

Molly being Molly of course has taken to wearing her gloves when playing!! is that what they call ‘method acting’ ??!!

pom pom snowballs


pom pom snowballs

-
All you need is a ball or two of white wool to repeat the fun in your house. I re-purposed a hot chicken tub from Tesco for our bucket, but you can use a hat, shoebox, plastic bowl or anything you have at hand for carrying around your snowballs.

how to make pom pom snowballs

-
Just paint the bucket with white paint and glue on strips of felt or paper to make a snowflake

-

making pom pom snowballs

-
And lightly trim around the pom pom to create lovely round snowballs.

affiliate linksEight to ten snowballs make for the perfect sustained snowball fight – using my Clover Pom Pom Maker (affiliate link) I made eight pom poms in one night in front of the telly!!

-

I hope this brings you as much joy as it has us xx

Popsicle Stick Dolls – that Ice-Skate!

$
0
0

Do you have extra craft sticks lying around and wondering what to do with them?  Remember the mollymoo popsicle stick dolls from last August?  Well this is an exciting new spin on this ever popular classic craft that your kids are going to absolutely love making and playing with.

My 3-year old recently entered a fun stage where he enjoys imaginative play and water play. So I tried encouraging both interests by making him these cute popsicle stick ice-skating dolls!

popsicle stick dolls


Here’s all you need to make these ice-skating dolls:

  • Large Popsicle Sticks
  • Plastic Disposable Cups
  • Aluminum Foil
  • Sharpie Markers
  • Scissors
  • Water


Let’s get making!  First, draw your dolls on the sticks, their hair, clothes, all the yummy details. Try to leave more space than I did on the bottom of your popsicle sticks, this way your dolls will appear as if they’re standing on the ice.


popsicle stick dolls


Next, rip a piece of aluminum foil and fold it in half.

popsicle stick dolls


Cut a small slit in the middle of your aluminum foil, just wide enough for your craft stick to fit through.

popsicle stick dolls


Pour some water into the plastic cups and cover with the aluminum foil. Make sure the slit is in the middle of the cup. Then stand your craft stick dolls into the water… it’s like you’re making popsicles!

popsicle stick dolls


Freeze overnight and then pull your dolls out of the cups. Now your ice-skaters are ready to skate!

popsicle stick dolls


Try them out on different surfaces and let the fun begin!

popsicle stick dolls


We had so much fun making and playing with these dolls. My son even asked me to make some boy ice-skater dolls the next time around!

popsicle stick dolls


I hope you have fun making this craft!
Happy making, friends!

Pom Pom Sweethearts – DIY Christmas Decorations

$
0
0

I have immersed myself fully now in Christmas crafting! bring on the modge podge and glitter I say! My first Christmas craft tutorial to share is a pair of cute pom pom sweethearts, DIY Christmas decorations to add a little smile to your tree.

DIY Christmas Decorations

All you need to make:
White wool, black and while felt, red colouring pencil, scissors and glue (fabric glue or tacky glue recommended).

Start by making your pom poms. I use Clover Pom Pom Makers which is one of most used tools in the craft room, they are so easy to use for kids and grown ups. Use these, cardboard circles or any pom pom maker of your choice. (affiliate link)

When made trim around the edges with your scissors to neaten the pom pom into a ball.

DIY Christmas Decorations

On the white felt draw in some peachy cheek circles with your colouring pencil and cut them out.

DIY Christmas Decorations

From the black felt cut little ovals for the eyes and thin strips for the smile – experiment with the curve and length of the smile to change the character of your pom pom.

Finally glue the eyes, smile and cheeks to your pom pom. Hold in position for a few seconds for the glue to take hold.

DIY Christmas Decorations

And Voila! you have some pom pom sweethearts to hang on your tree – hang them close together so they don’t get lonely xxx

DIY Christmas Decorations

Happy Crafting
Michelle


Handmade Stacking Blocks – Nutcracker

$
0
0

One of my favourite symbols of Christmas is the Nutcracker – so colourful and elegant in all his finery standing proudly on the mantel or hanging from the tree. So last weekend I chopped up a block of balsa wood into cubes and made a quick n’ sweet child friendly nutcracker handmade stacking blocks toy to build and play with.

Stacking blocks are such an easy and accessible toy for parents to make for their little ones, and blocks are such great toys for babies, from the age of about 12 months, especially for developing hand-eye coordination skills. At this age babies naturally start to learn to organize, balance, and stack.

Handmade Stacking Blocks

All you need to make is enough balsa wood to cut and give you four cubes, and acrylic paint. (I love working with balsa wood, it’s so light and fluffy almost! perfect for little hands, so light each block feels like a cube of foam)

Handmade Stacking Blocks

Freehand paint the blocks or mark out your design with pencil first and then paint.

Handmade Stacking Blocks

And Voilla!! you have a friendly little nutcracker to turn on his head and back again.

Handmade Stacking Blocks

Note: water-based acrylic paints that are completely toxin free and safe for children. Coat the blocks with one layer of Mod Podge® to seal the colour and wood: it dries clear, providing a wipe down surface which can help to keep the blocks hygienically clean.


Angel Craft – Paper Cup Angel Luminaries

$
0
0

When I imagine Christmas, I always think of Christmas trees, twinkly lights, and angels. Knowing that Michelle loves sharing fairy crafts here at MollyMoo, I thought you would appreciate today’s angel craft too!  These little paper cup angels are super sweet and simple to make. Perfect for adding a bit of holiday cheer during the day and giving your home a lovely warm and angelic cozy glow at night.

angel craft


Here’s what you’ll need to make these glowing angels:

• Clear Plastic Cups
• Printer paper
• Pen
• Crayons
• Sharpie Markers
• Scissors
• Clear Tape
• LED Tea Lights (1-2 per angel)


Let’s make some paper cup angels!

Step 1:
Roll your plastic cup over a sheet of paper and trace along it’s edges as it rolls. Now you’ll have a curved shape which will fit nicely over your cup. Cut the shape out, and trim off about 1” to 1 ½” off the top (shown by the curved line) so that you’ll have space for the angel’s face.


roll the cup to make paper cup angel luminaries


Step 2:
Colour in your curved shape.

color in your angel dress


Step 3:
Accordion fold your shape.

accordion fold your angel dress


Step 4:
Cut out different shapes holes (it’s like you’re cutting out a snowflake!)

cut out holes in your paper angel dress


Step 5:
Open up your folded piece of paper. Use Sharpie markers to add more decorations to your design. Yay! Now your angel has a lovely lacy dress to wear. Cut out and colour a face and pair of wings.

add details, face, and wings


Step 6:
Tape your dress, face, and wings onto your plastic cup.

paper cup angels


Place 1-2 LED tea lights under each cup to make your angels glow.

glowing paper cup angel luminaries

Aren’t they beautiful? I hope you enjoy making these lovely glowing pretties with your children.


Happy making friends! ~ Leslie


Christmas & Winter Inspiration on Pinterest

Make sure to follow the MollyMoo Christmas board on Pinterest for ooodles of daily festive inspiration


Free Printables: Reindeer Gift Box

$
0
0

A little free printables treat for the beginning of all things festive! A sweet reindeer gift box, or treat box, depending on what special surprise you want to hide inside.

I love sharing printables here on MollyMoo as a great big Thank You for your continued support for all things MollyMoo and… because cuteness just ‘has’ to be shared!!

free printables

-
Click here to download

Reindeer Treat Box Page 1
Reindeer Treat Box Page 2

free printables


– The free printable pack consists of two A4 pages
– Print the template sheets on 200gm card
– Cut out each box element with your craft knife
– Score each fold line very lightly with the ‘back’ of the craft knife blade so that you get crisp corners and folds
– Start gluing the tabs down – I find it easier to glue one tab at a time and hold it in position for a few seconds so it aligns perfectly to the edges.
– The tabs are labelled on the template so it’s all very intuitive as to what tab glues to where – just make sure not to glue the lid closed… you need to fill it with sweeties or gingerbread cookies yet!
– Finally glue on the red Rudolf nose – you can make a small red wool pom pom or use a store bought fluffy pom pom like I did too.

free printables

Let the festive preparations begin!
LOL Michelle
xx

I love feedback so please leave a comment and let me know what you think… or just say hi

Did you download and make my Easter Bunny and Chick Treat Boxes?

Popsicle Stick Nutcrackers

$
0
0

I’m not as organised as I would like for Christmas in terms of crafty goodness this year – I find myself cuddled up under a fleece blankie on the couch more that at my desk in the evenings after work! I just can’t get warm!!

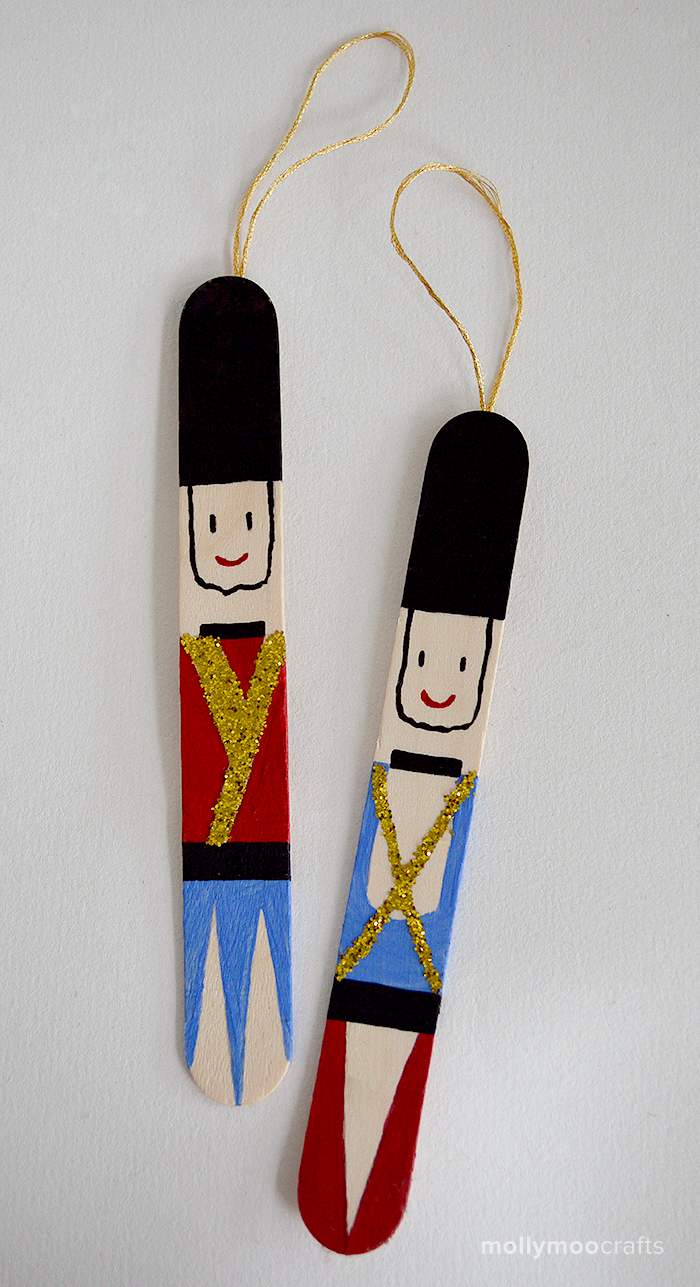
Anyhoo to get me ‘kick-started’ I am sharing a super simple little activity today – Popsicle Stick Nutcrackers, so simple they don’t need a step by step!

All you need to do is invite the kids to draw their nutcracker on the popsicle sticks, paint or colour them in with permanent sharpie markers and add some touches of glitter. Then just glue a piece of string or embroidery thread in a loop to the back and voila! more cuteness to hang on the tree xx

popsicle stick nutcrackers


Reindeer Treat Cups

$
0
0

The Christmas fun continues on MollyMoo with some dinky Reindeer Treat Cups – perfect for the last day of school party, playdates and family visits over the holidays. Aren’t they cute?

All you need to make are some mini foam cups, popsicle sticks, drawing paper, red mini pom poms (buttons or red circle stickers will work perfectly if you don’t have pom poms). And for the reindeer you just need white paper, a black marker, some colouring pencils and a scissors to cut them out.

A quick note of thanks to the very patient, and slightly bemused, sweet shop store assistant who donned her plastic gloves and helped me pick out *only* the red and green smarties from the smartie jar for the photograph set up!!!

reindeer-treat-cups

-
Begin by painting the outside of the foam cups with brown paint.
When dry glue on the pom poms.

reindeer treat cups

Draw some reindeer heads on the white paper, simple black outline like shown…. colour them in and cut them out.

reindeer treat cups

Cut your popsicle sticks in half, one half per reindeer.

Glue the reindeer head to the top of the popsicle stick.

reindeer treat cups

Glue the popsicle stick to the inside of the cup

And fill with yummy treats for the cutest Christmas snacks ever!

reindeer treat cups


Viewing all 16 articles
Browse latest View live